Proxmox Virtual Environment setup
Overview
Introduction.
What is Proxmox virtual environment.
Proxmox VE is a type 1 hypervisor which means it is an operating system meant to manage virtual machines. A type 1 hypervisor is installed directly on your hardware unlike type 2 hypervisors which require an operating system like windows to be installed first.
Requirements
Proxmox can be run on everything from an old laptop to enterprise equipment. If you have a machine with 8 gigabytes of memory, a processor with 4 cores and a decently sized hard drive you are all set! Bonus if you are able to have two hard drives. Proxmox can also be installed on a USB thumb drive if need be, this might be less reliable in the long run though.
You will need an USB with the installation media. Proxmox VE ISO link Various methods can be user to create bootable media. Ventoy is one I would recommend.
What I will be using
In this setup I am using an HP EliteDesk 800 G3 mini with the following specifications:
- Processor: Intel Core i5-7500T 4 cores
- Graphics: Intel HD Graphics 630
- memory: 16GB DDR4
- Storage:
- 1 x Internal m.2 SSD 256GB
- 1 x Internal sata SSD 256GB
- 1 x External sata HDD 1TB Connected with USB
- Network:
- 1 x internal gigabit ethernet port
- 1 x USB gigabit ethernet adapter
- 1 x USB fast ethernet adapter
It is far from enterprise grade but it's a step up from a raspberry pi. Also you don't have to dread the bill from your power company the same way if you got actual server hardware.
BIOS configuration
In the BIOS there is usually a setting named along the lines of secure boot. If secure boot is enabled you will have to disable it. Secure boot will block Linux distributions from being installed.
Before you start the installation it can be useful to enable virtualization in the BIOS of your machine. It can be done after install if forgotten.
If available it can be a good idea to enable the automatic boot on power. This helps the machine start up again after power loss.
Tips
Get everything you want connected in the category of PCIE devices like graphics cards and network (USB and PCIE) connected before installation. I have had issues with adding or taking away any of those generating issues.
The installation process is as straight forward as can be. There is a few things that can be planed before starting installation.
- What you want the machine to be named. For me it will be proxmoxbox in this guide
- IP addresses and network. For you it might be 192.168.1.(number 2 to 254). If you are unsure when it comes to network, connect your machine to network before starting. This will give you an IP address that is not in use on the network.
Video guide
Setup
Installation
- To get the installation started, enter the boot menu on the pc you wish to install proxmox on. Different manufacturers use different keyboard keys to enter the boot menu. If you are unsure, pressing the escape key during startup might stop normal boot and give you the option to enter the boot menu. If you are having trouble, try searching for the PC or motherboard manufacturer and boot menu on google.
- Choose your installation media. Names might not always be understandable. If you pick the wrong drive just restart the system and try again. Since I use Ventoy I get an additional menu where I have to select which operating system to install.
- Once the installation has started you will be greeted by the Proxmox logo and a few options. Just press enter when Install Proxmox VE text is red.
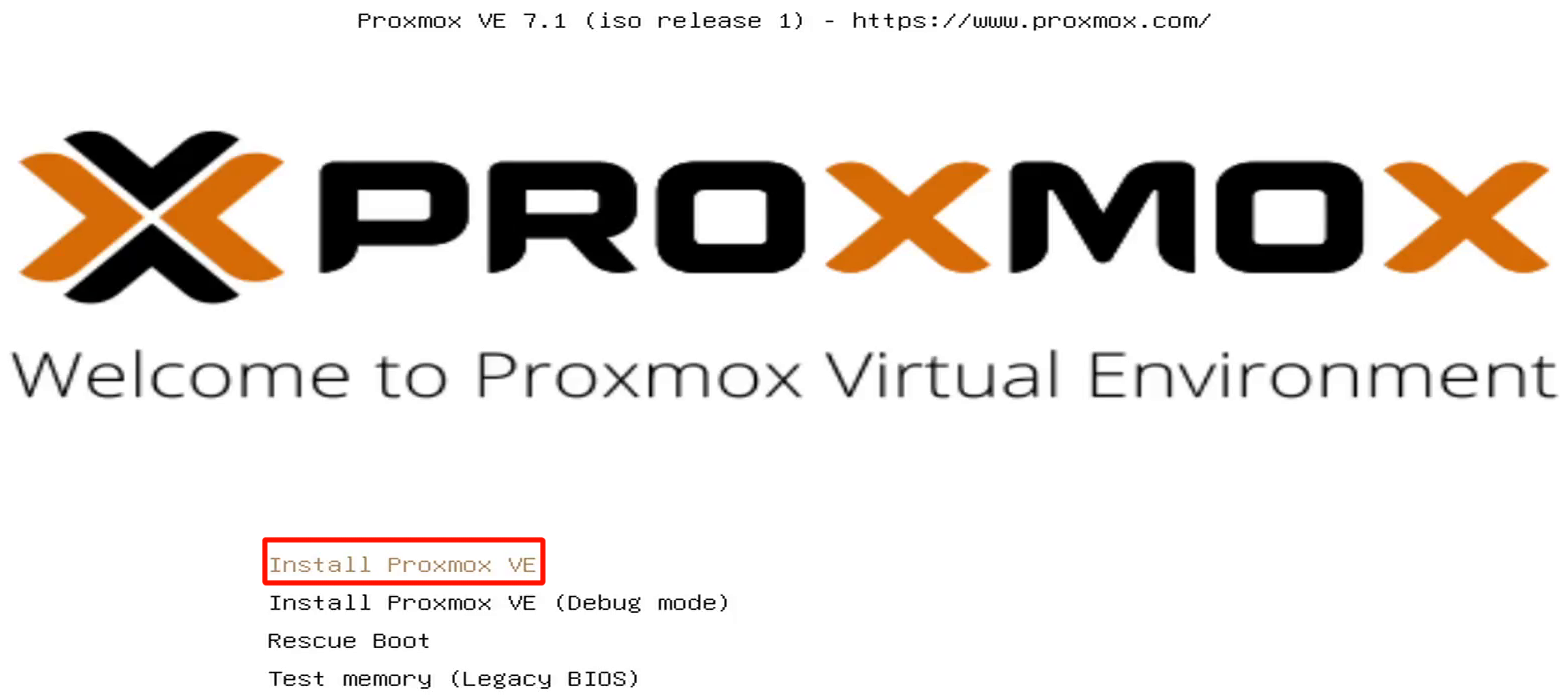
- Click I agree on the end user license agreement (EULA) to proceed.
- Next up is selecting the drive you wish to install to. I am getting 4 drives to select from. 3 of these is the previously mentioned in addition to the USB I am installing from. Here I will be installing to the 1 terabyte hard drive. There is more that can be changed if you click options like setting up raid but I will not go over that now. Click next when done.

- Setup localization, this is done fast by just typing the name of your country in the labeled country. This should set correct time zone and keyboard layout.
- Enter your desired password and email. Email is just if you decide to setup notifications for different alerts.
- Now for hostname and network configuration. Enter the name you want followed a domain or .local. Selecting the correct network card can be hard if you have multiple of them and not connected it to network. something that might help is that the USB adapters are often named enx while internal is named eno.
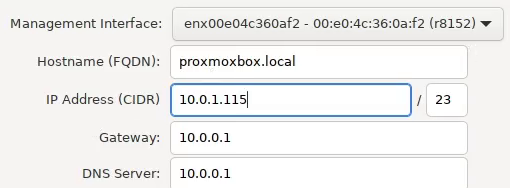
- Management Interface: Select the desired network card or in this case adapter.
- Hostname (FQDN (Fully Qualified Domain Name)): Set what you want to name the machine and domain separated by a dot (name.domain) If you do not have a domain just use local instead of some other domain.
- IP Address (CIDR): Set the address you wish to use to connect to the machine with. The correct network mask also must be set, in this case as a 23 instead of 255.255.254.0 for me. If you are unsure about this, just connect the machine to network before starting it.
- Gateway: This is the IP address of your router. This is so the installation knows where to go to reach the internet and other network related business.
- DNS Server: Usually you have some DNS servers setup on your router so you can just point to that or you can point to someone else, like Cloudflare with 1.0.0.1 if you wish.
- At the end of the setup you get a screen with all the information you have entered. Now all you have to do is click install and wait for it to finish.
- Finally when the installation have completed you will be greeted by a black screen with some text. To enter the Proxmox user interface, take the address (https://"IP address":8006) and enter it into your preferred browser.
Login in
The first thing you will be greeted with is a message warning you that your connection is not private, This is because you do not have SSL certificates set up on the server. It is safe to select Advanced followed by Proceed.
When it is time to login, you can enter root as username and the password you created during the setup process. Realm should be sett as "Linux PAM standard authentication." after choosing language you can go ahead and click Login.
Now you will get a box saying No valid subscription. Proxmox is completely free to use, but you can pay and get some functionality and support.

Quick info
In the upper left corner when Server View is selected you can se your current "Datacenter." Here you will be able to see all your virtual machines, storage and Proxmox nodes should you choose to create a cluster.
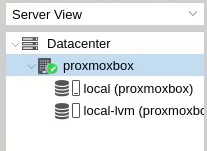
- Datacenter: Configurations done here is cluster wide and will affect all machines in the cluster.
- "proxmoxbox": This is the machine that was installed also called a node. If you install Proxmox on more machines you can create a cluster and add them and see them here.
- local & local-lvm: These are storage setup on the disk that Proxmox was installed on. There will be added more when the other drives are configured.
- Virtual machines that is created will also be seen in this menu under the Proxmox node they are created on.
Configuration
Enable updates
For now only Debian and Proxmox enterprise repositories are active. Unless you have a license you will not get any updates from the enterprise repositories. this is easily fixed by switching to the community repository.

- select node (machine):
- In the menu to the right of the server view go to Repositories which are under Updates.
- Select the enterprise repository by clicking on it. If you are unsure, look at the URL.
- Click disable. The reason for this is to remove an error that comes during update when you do not have a license.
- Now to add the community repository. Click the Add button.
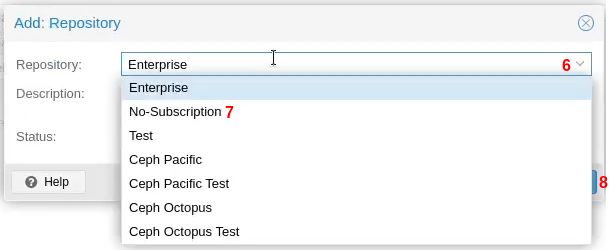
- Click the drop down menu to see the alternatives.
- Select No-Subscription.
- Now click add to add this repository to the update list.
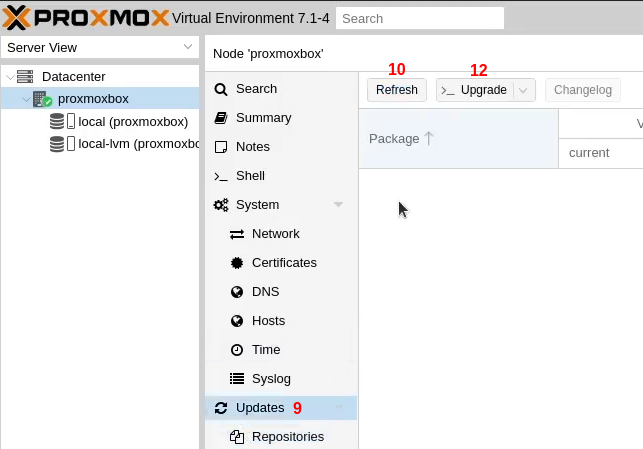
- To update, navigate to Updates.
- Clicking refresh will first give you a message about not having a valid subscription. Ignore that and click ok.
- The refresh box is doing the same as running "apt-get update" in the terminal. close the box when you see the message "TASK OK"
- When you now click Upgrade, you will get a new window with a terminal.
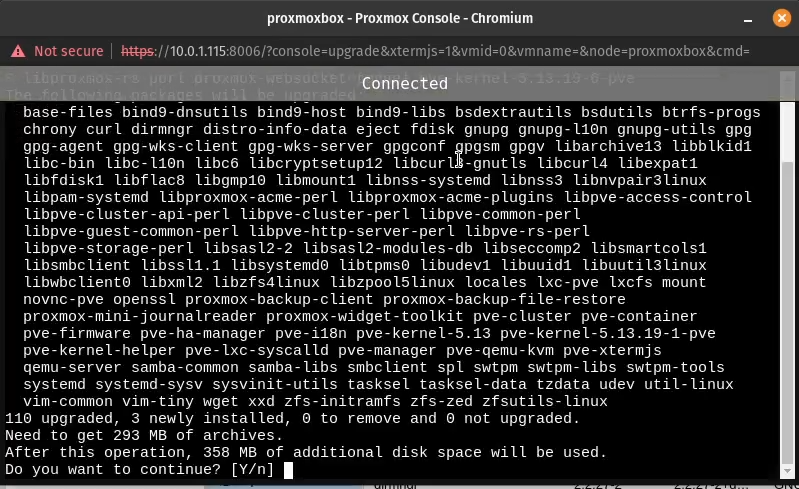
- In the window you will be prompted with packages that needs to be updated. All you must do is press "Enter" because the uppercase "Y" means it is the default option. Update time is dependent on the age of your ISO. But you can do other things wile updating.
- Finally you will get a message saying "Your System is up-to-date" you can now either type "exit" or simply press the "x" up in the corner to close the window.
Initialize disks
Initializing disks have been made really simple in Proxmox 7. Previously you would have to use fdisk which is not hard, but I am for the automation aspect of it! It should not be possible to wipe the boot drive or drives that is in use by Proxmox, but better to be on the safe side and not try. I will be using LVM-Thin. What is nice with that instead of others is that only used space on virtual machines is taken up from the disk. I would not use that in a production environment, it could generate issues if you over allocate storage and some virtual machines start using too much space. Also you do not get any raid functions with this.
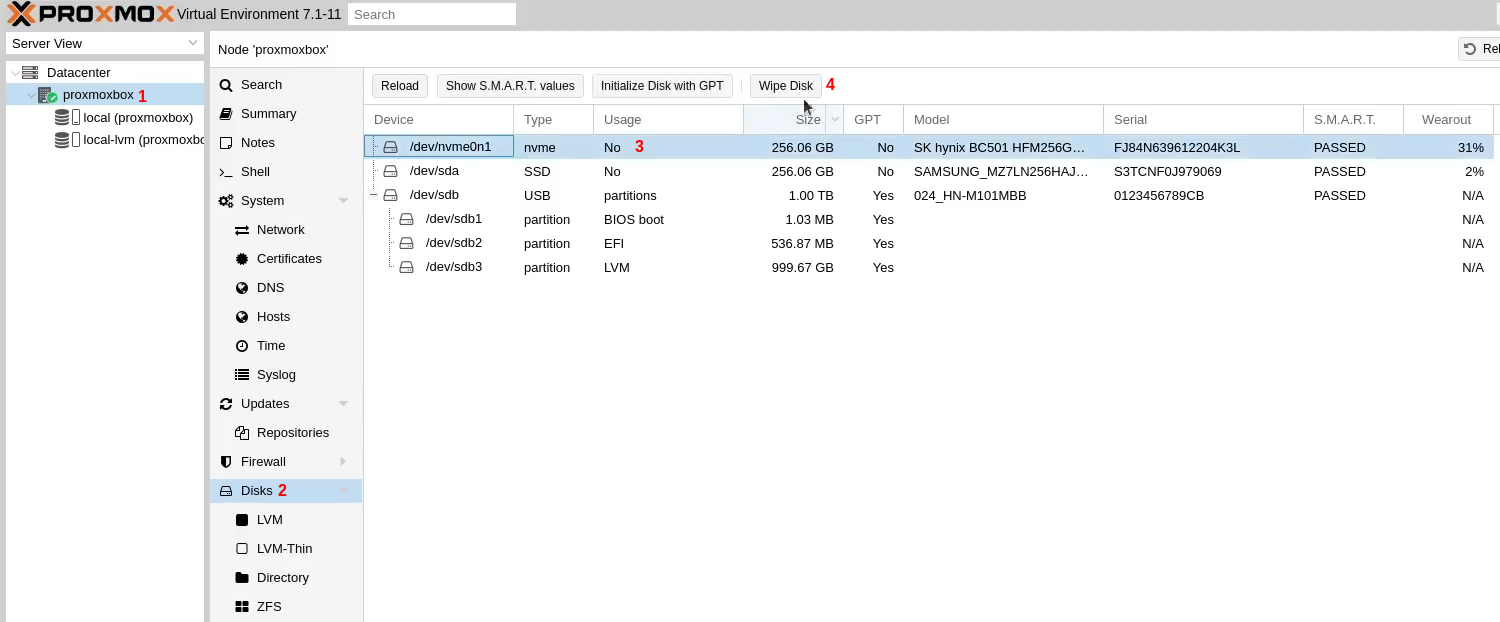
- Select the node (machine) you wish to initialize drives on.
- In the menu to the right of the Server View click on Disks
- Mark the disk you wish to initialize by clicking it.
- Click the Wipe button, you will get a warning that all the data on the disk will be lost. the process will start after pressing yes. The reason for doing this is that the disk must be empty before Proxmox will setup a new file system on it.
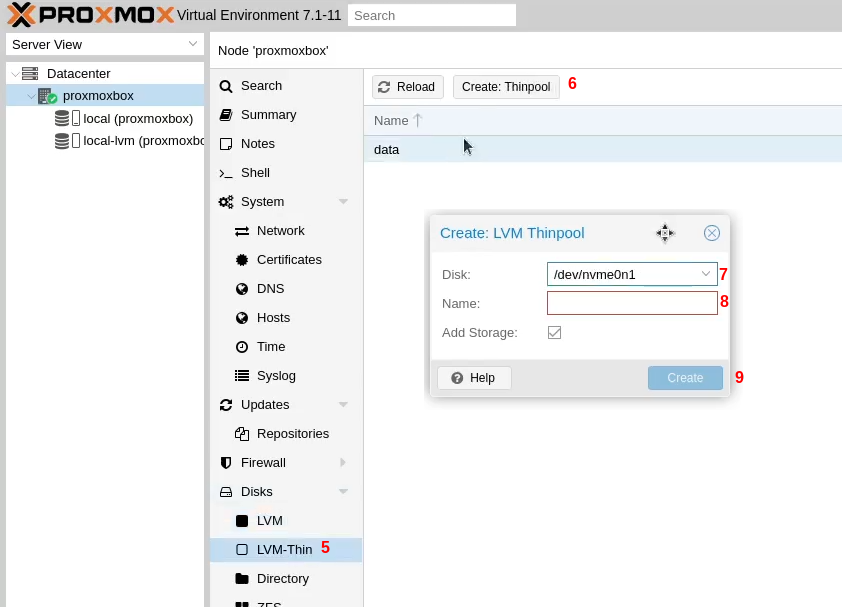
- Now to setting up the disk. Click LVM-Thin under disks.
- Click "Create: Thinpool"
- In the popup window, select disk you want in the drop down menu.
- For name I try to use something short and descriptive.
- When clicking Create, the disk will be made ready. When it is done you will be able to see it under your machine in the server view.
Upload ISO files.
During installation a part was partitioned out for uploading ISO files. That functionality can be added to other disks but I have not seen any reason for that.
There are two simple ways to upload ISO files to Proxmox. One is uploading an ISO file that you have on your pc. The other way is taking the link and getting Proxmox to download the file from a URL.
Here are the links to where I downloaded the ISO files I use in the examples.
- Link to windows 10 ISO download: https://www.microsoft.com/en-us/software-download/windows10ISO
- Link to Windows VirtIO Drivers: https://pve.proxmox.com/wiki/Windows_VirtIO_Drivers
From local storage.
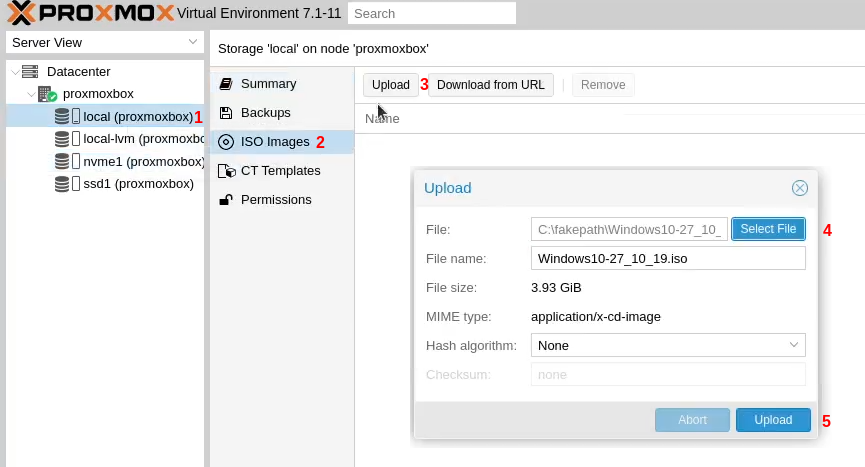
- Start with navigating to the storage named local in the server view.
- In the menu to the right of server view click ISO Images.
- Click the upload button.
- When the select file is clicked, a file browser will be opened. Navigate to where you have stored your ISO file and select it.
- To start the file transfer, click Upload. Nothing can be done during this so just lean back and wait.
- After a little while a new box will appear which is for the process of copying the file from one place to another on Proxmox. nothing else to do than waiting some more.
- The ISO is ready to be used when you see the message TASK OK.
From link
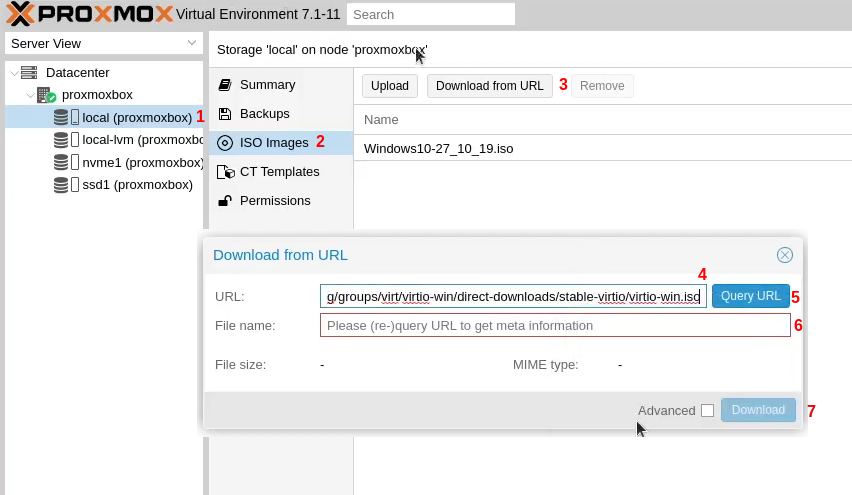
- Start with navigating to the storage named local in the server view.
- In the menu to the right of server view click ISO Images.
- Clicking Download from URL opens a little window.
- Type or paste in the download link where it says URL:
- Press Query URL so Proxmox can see what it gets back.
- As long as you get a file with the file extension .iso you should be good to go.
- Press the Download button to start downloading the file.
- In the next window you will get some information about the download and updates on the percentage downloaded.
- The file is ready to use when you get the message TASK OK
Ready to install virtual machines
As long as everything went ok, or you could work out the trouble that might have arisen you should be all sett to start installing virtual machines.
My reason for writing this little guide for Proxmox is equal parts why not, doing it for myself and that I like Proxmox.