Virtual Ubuntu server setup
Overview
Introduction.
What is Ubuntu server.
I will be using Ubuntu server for this setup, but many other Linux distributions can be set up the same way with minor or no changes in the VM configuration.
Ubuntu server is a lightweight Linux distribution that is great for running services without taking up a lot of resources. It does not come with a GUI so you will need to have or want to gain experience with terminal.
Installation media
If you wish install Ubuntu server. Head over to Ubuntu.com, and navigate to downloads followed by selecting Ubuntu server.
Requirements
- CPU: 1 gigahertz or better.
- RAM: 1 gigabyte or more.
- Disk: a minimum of 2.5 gigabytes.
This is really light so as long as your machine was made during the last 10 years you should be good to go!
Video guide
Setup
Upload ISO.
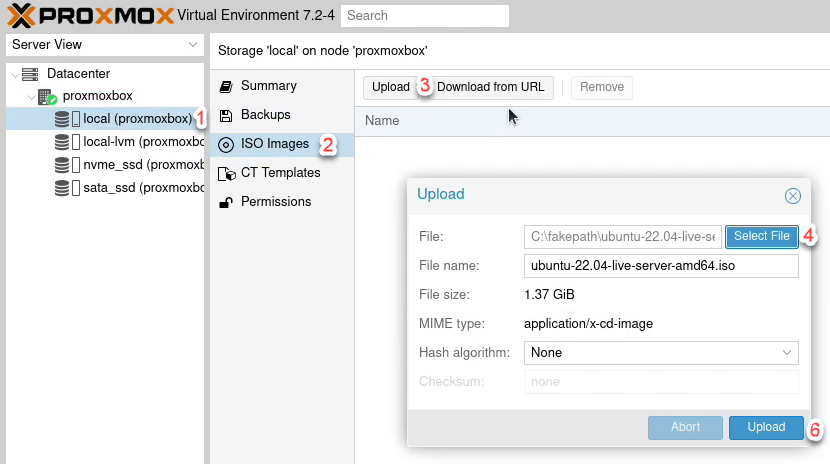
- Start with navigating to the storage named local in the server view.
- In the menu to the right of server view click ISO Images.
- Click the upload button.
- When the select file is clicked, a file browser will be opened.
- Navigate to where you have stored your ISO file and select it.
- To start the file transfer, click Upload. Nothing can be done during this so just lean back and wait.
- After a little while a new box will appear which is for the process of copying the file from one place to another on Proxmox. nothing else to do than waiting some more.
- The ISO is ready to be used when you see the message TASK OK.
Configure VM
-
In the upper right corner of Proxmox click Create VM to open the virtual machine editor.
-
General.
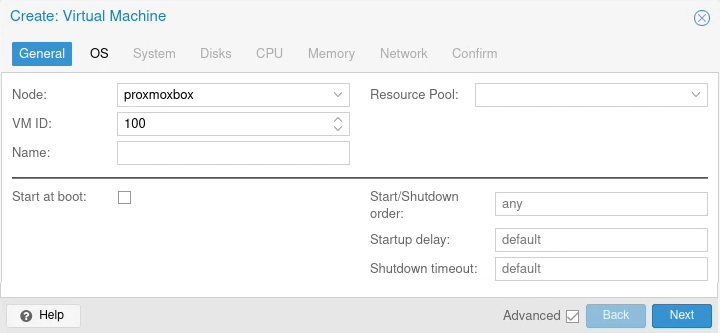
- Node selection comes into play if you setup multiple Proxmox instances in a cluster.
- VM ID is what Proxmox uses to identify the virtual machines.
- Name Is what you wish the VM to be called, It can be changed if you regret the name.
- Start at boot Makes it so that if you restart your Proxmox node the VM will be started once the noe is up again.
-
OS
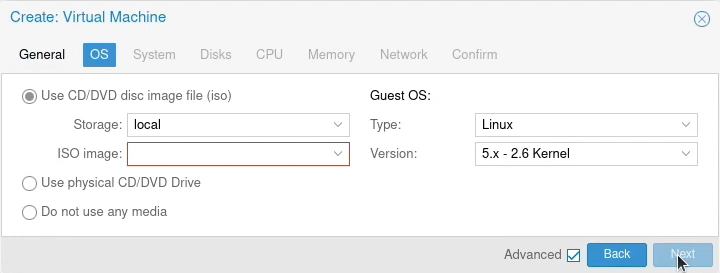
- Storage Is where the ISO you wish to use is located. This is usually "local"
- ISO image select the ISO you will be using for your installation.
-
System. Nothing needs to be changed here for this installation.
-
Disks.
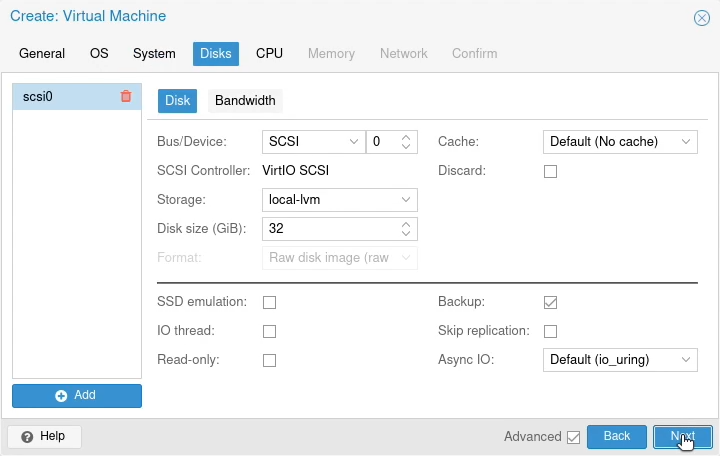
- Storage Select the drive you wish the disk of the VM to be located on. This can be changed later with minimal effort if you change your mind.
- Disk size Select the size of the disk in gigabytes. If your drive is partitioned with LVM-thin, you can safely provision more than you will use. This is because the VM will not be given more than what is actually used.
-
CPU
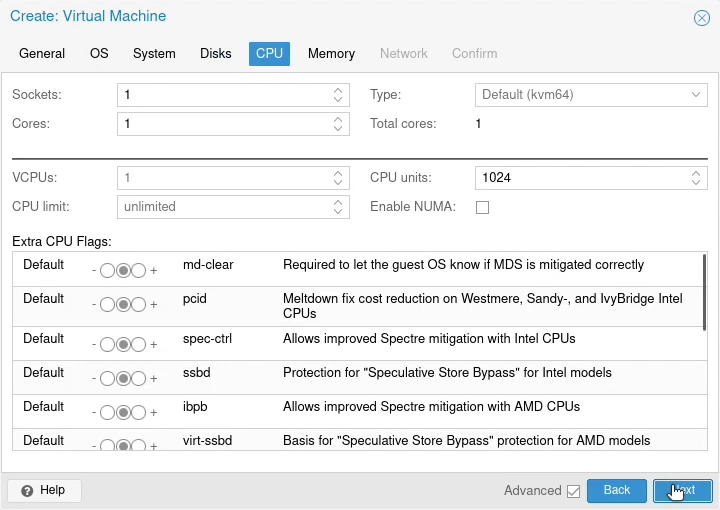
- Sockets If you have multiple processors in your machine, you will be able to provision cores from both of them.
- Cores Give the VM the appropriate number of cores, I usually give half of what is available. It is possible to allocate all the cores of your machine to all the virtual machines. The problem comes if a VM starts using the entire CPU and grinds the system to a halt.
-
Memory
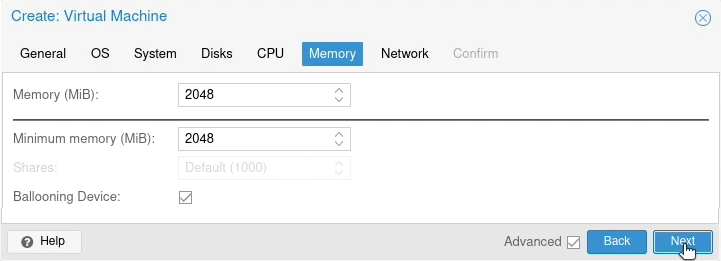
- Memory Give the VM memory in megabytes to work with. The amount is dependent of what you will be using VM for. This can easily be changed later to give more or less.
- Minimum memory This is a safety feature combined with ballooning guaranteeing that the VM has access to at least the specified amount. I usually give it 512mb here.
- Ballooning device When this is ticked, The VM will only be allocated the memory it actually uses at the moment. With this you will be able to overprovision the memory. But be careful, this can cause crashes and problems with VM's not starting.
Little overview for GB to MB
| 1 GB | 2 GB | 4 GB | 8 GB | 16 GB | 32 GB |
|---|---|---|---|---|---|
| 1024 MB | 2048 MB | 4096 MB | 8192 MB | 16384 MB | 32768 MB |
There is no need to use these values, i just like to use them myself so everything looks right.
- Network. Nothing will be changed here for now. The same network port as Proxmox will be used.
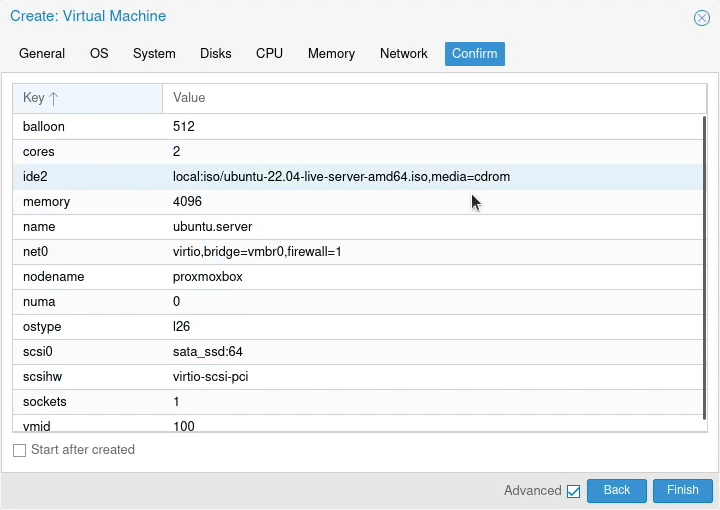
- Confirm. This is a summary screen to see over everything that has been set. You can also make it start after you click finish by ticking "Start after created".
Installation.
- Open a console window to the virtual machine with one of the three ways. You will also be able to start the VM from the console window if you have not yet done that.
- Double clicking the VM in server view.
- Right clicking it followed by clicking console in the menu that comes up
- Clicking the console button upper right in the window when you have selected the correct VM.
- Click enter or wait for the time to run out on "Try or Install Ubuntu Server".
- Select the language you wish to use, and press enter.
- You can update to the new installer or not. At the moment i will not be updating but both works great!

- Select your keyboard layout. Variation should be updated after selecting layout. If you have a different variation, you can change that as well.

- You can let the server get an IP from the DHCP but if you want to connect to it regularly, you should give it a static IP.
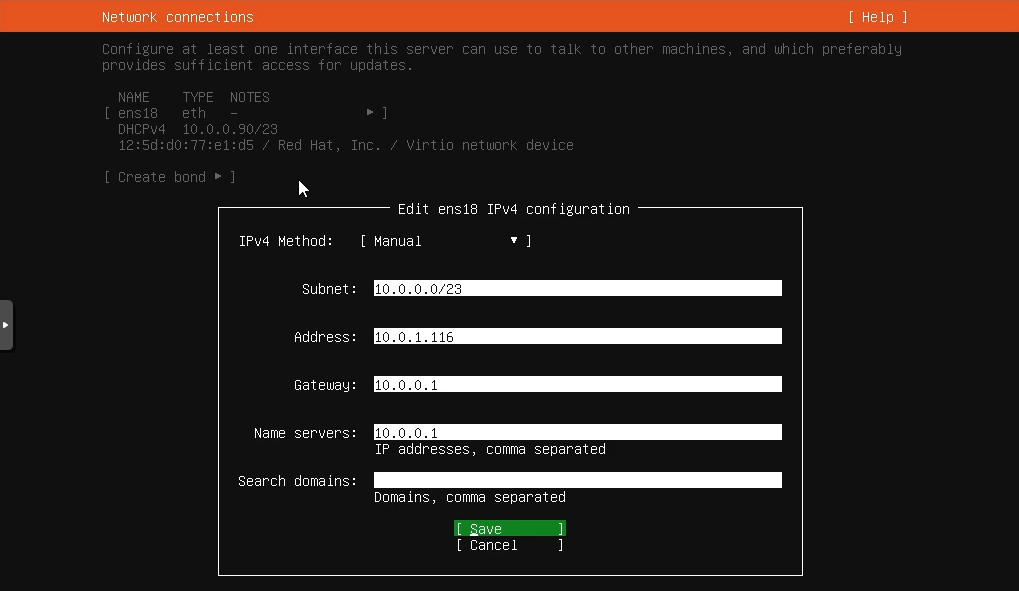
- Navigate to the network card.
- Select Edit IPv4
- On IPv4 Method change to manual
- Subnet type in the first IP of the network followed by a slash, then the number of bits in the netmask which is usually 24.
- Address Enter the address you want the server to have.
- Gateway Enter the address of your router so the server knows where to reach the internet.
- Name servers Here you can have the address of your router, other name servers like google (8.8.8.8) or you can have multiple.
- Save and continue.
- keep pressing done and continue until you reach Profile setup
- Setup a user to use for your server.
- Your name The name of the user. If you are only going to have one user it's not that important, but if there will be multiple people it is great to document whose user it is.
- Your server's name Give your server a name. I usually try to name it something short and descriptive so i know where i am when connected to it.

- SSH setup tick off on Install OpenSSH server so you can connect to it from another machine when the installation is done.

- In the Featured Server Snaps menu, you will be able to select services to be installed with the server.
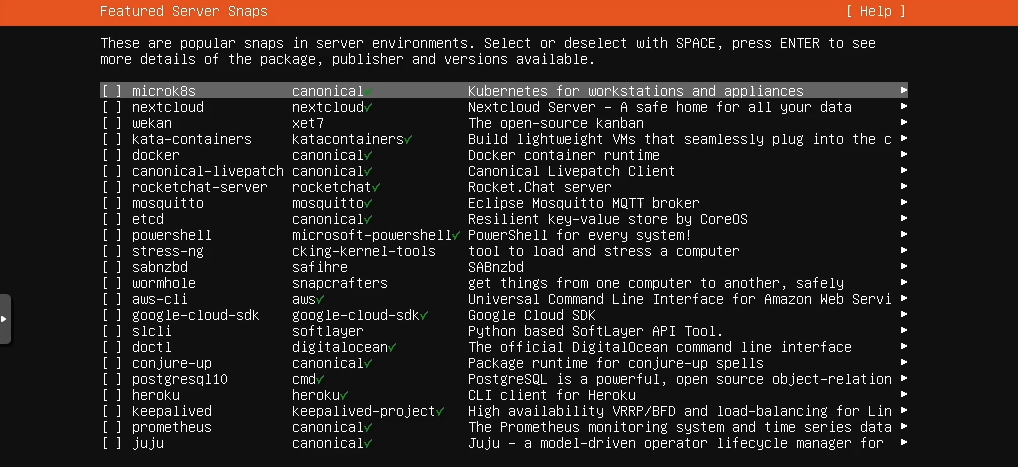
- When you click done, the installation will start to write to the disk.
- After a while you will be prompted to restart the machine. Proxmox will change the boot media automatically so you can just press enter when asked to remove installation media.
Logging in
-
The VM will be ready for use once it has started up and you can login with the username and password you created earlier.
-
Another way is to connect with SSH from another machine, this can be done with a program like Putty or directly from a terminal. From terminal:
- Type in "ssh (username)@(server ip)" and hit enter.
- When prompted if you wish to connect, type "yes" in full. This will only show up once per machine pair.
- Enter your password you will be connected.

What to use the server for
Services
In the category of services, here is a tiny list with a few suggestions:
- Docker - Container management framework.
- Kubernetes - Container management framework.
- Rancher - Graphical container management system.
- Portainer - Graphical container management system.
- Kasm - Containerized programs and operating systems accessed via browser.
- Dokuwiki - Web server for documentation.
- Wordpress - Web server for blogging
- Apache Guacamole - Remote connection to servers via web browser
- OpenVPN - VPN to connect from anywhere in the world to your home network.
Game servers
If you want your own server to play with your friends, you can head over to linuxgsm.com. They have loads of servers for both old and new games. So, if you want to play a multi-player game that has not had official servers in a long time, take a look there to see if you can set one up yourself.
Good luck!
There are loads of things to use this for and learn from! Be ready to search up how to do things and errors along the way. Things often do not go according to plan. Good luck!