Virtual Windows 11 setup
Overview
Introduction.
What is Windows 11?
Windows 11 is the latest consumer operating system from Microsoft. It is one of the more accessible operating systems out there, most programs will be available and working on a Windows operating system.
If you work in IT support or want to get into it, there is a great chance you will have to do support on Windows. Having a VM that is backed up is a great place to learn and do mistakes without consequences.
The Windows operating systems is versatile and can be used for most of the tasks you throw at it.
Requirements
- Processor: 1 gigahertz with 2 cores.
- Memory: 4 gigabyte.
- Storage 64 gigabyte.
- BIOS: UEFI.
- TPM: Version 2.0
These are the requirements according to Microsoft. You can of course give more resources. In the case of storage you can also allocate less if you want to but this might cause instability in the long run.
Video guide
Installation media
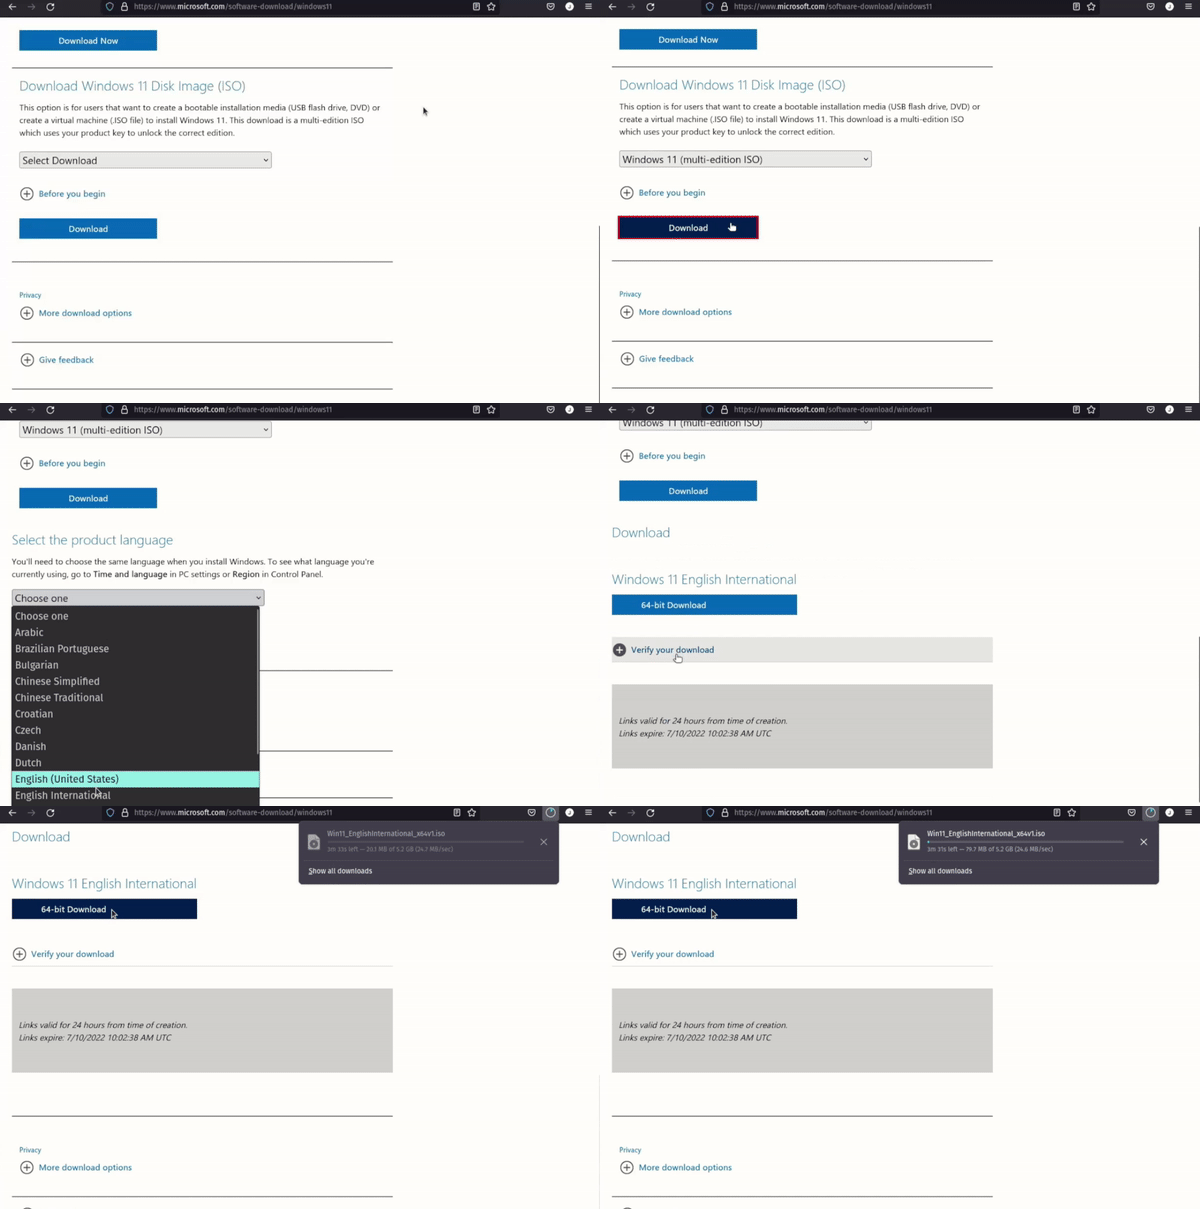
- To get the ISO file for Windows 11 head over to Microsoft with this link or search for "Windows 11 ISO" in your favorite search engine.
- Go down to Download Windows 11 Disk Image (ISO)
- Select Windows edition and click download.
- Choose your language then click confirm.
- You now finally have a download link that works for 24 hours.
You can now either download the file to your pc and then upload it to Proxmox. Or you can copy the link by right clicking the download button and clicking copy link, then taking that link over to Proxmox.
Download from URL

- In Proxmox click the drive named local in server view.
- Click ISO images in the menu to the right.
- Click Download from URL
- Paste the link you copied into the first field and click Query URL
- When a name of the ISO and file size is populated you can click Download
Upload ISO.
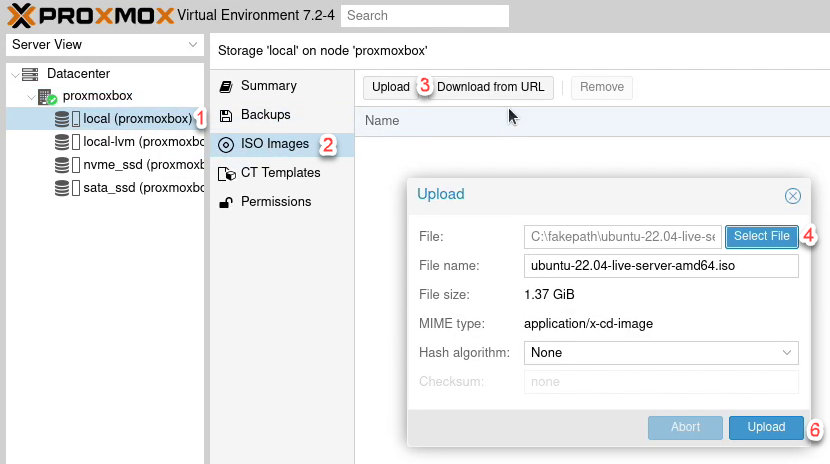
- Start with navigating to the storage named local in the server view.
- In the menu to the right of server view click ISO Images.
- Click the upload button.
- When the select file is clicked, a file browser will be opened.
- Navigate to where you have stored your ISO file and select it.
- To start the file transfer, click Upload. Nothing can be done during this so just lean back and wait.
- After a little while a new box will appear which is for the process of copying the file from one place to another on Proxmox. nothing else to do than waiting some more.
In addition to the windows 11 ISO file you need the VirtIO ISO file with the drivers for virtual hardware. You can copy this link and follow the previous steps to either download the ISO directly in Proxmox or upload from your PC. Here is an alternate Link to the Github page in case the other one stops working. You can also just search for "windows 11 virtio iso" in your favorite search engine.
Create and configure VM
I have tried loads of different things with Windows 10 including not changing from Linux configuration. It can work seemingly without problems. The trouble can come when you want to pass through PCI devices or you just have different unexplained instabilities.
Start by clicking the Create VM button in the upper right corner of Proxmox.
- General.
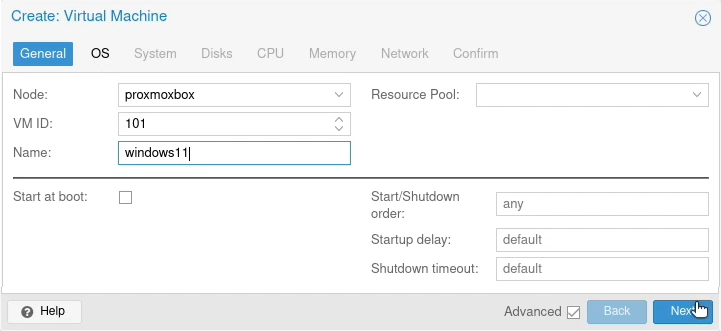
- Node: Make sure you have selected the correct node if you have multiple.
- VM ID: No need to change unless you want to.
- Name: Give your VM a name. This can be changed later with no problem.
- Start at boot: If you check this option, the VM will start after Proxmox have started.
- OS.
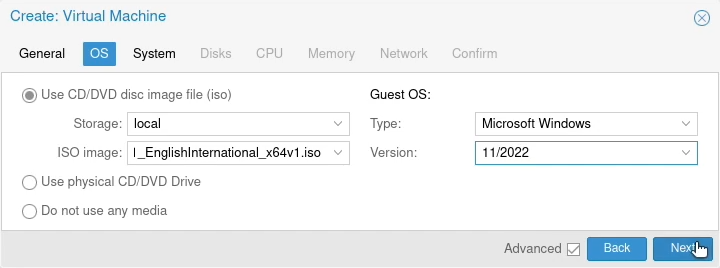
- Storage: The default location for ISO files is the storage partition named local. You are able to have ISO files on other drives and partitions but it's usually not worth changing.
- ISO image: Select the ISO file for windows.
- Type: Change to Microsoft Windows. This will automatically make a few changes ahead in the setup.
- Version: Change to the windows version you wish to install.
- System
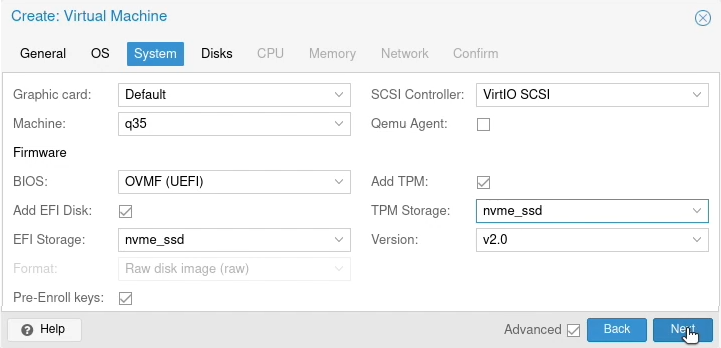
- Machine: Make sure machine is set to q35.
- BIOS: Microsoft have it as a requirement to use UEFI so switch over to OVMF (UEFI).
- Add EFI Disk and EFI Storage: EFI Disk should to be checked for Windows. You can do without it, but it is a backup in case the boot part of windows gets corrupted. For EFI Disk you Should use the same storage you plan to use for the VM disk.
- SCSI Controller: Set this to VirtIO SCSI if not already.
- Add TPM TPM is a requirement for Windows 11 and luckily Proxmox can virtualize it. So even if your machine does not have the required hardware, you are able to install Windows 11 as a guest OS.
- TPM Storage As EFI Storage this should point to the drive you plan to setup the disk for the VM on.
- Version Make sure V2.0 is selected if you are installing Windows 11.
- Disks.
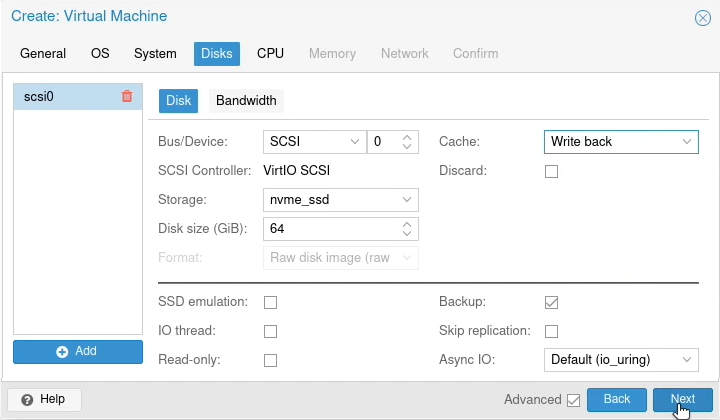
- Bus Device: I'm setting this to SCSI for compatibility.
- Storage: For extra speed I will be using the NVME SSD I have in the system. It is also the same drive as I used in the previous steps.
- Disk size: According to Microsoft the minimum required drive size is 64 Gigabytes so give it that or more.
- Cache: I set this to "write back" as it is the most stable option according to the Proxmox wiki.
- CPU.
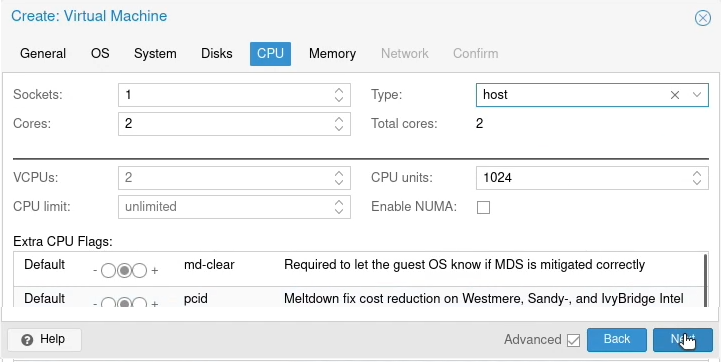
- Sockets: My system only have 1 processor so this will be staying at 1 for me. If you have more cores in your system, you can allocate both and give cores from both of them.
- Cores: I usually give systems access to half of the cores. That way they should have enough power and I don't have to worry about runaway processor usage.
- Type: There is a range of CPU types you can make it look like you have but I will just passthrough host as the type.
- Extra CPU Flags: There are loads of other CPU flags you can change, none of which I touch.
- Memory.
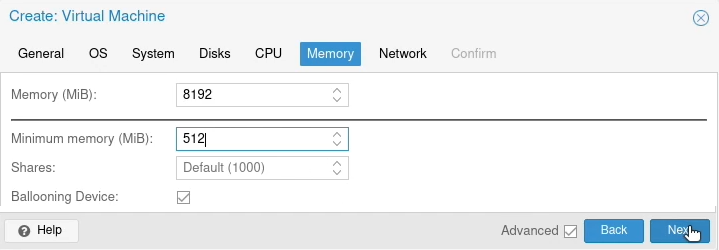
- Memory: For now I am allocating 8 gigabyte's of memory to this VM. It is double what is needed but installation usually is a bit faster with more memory. This can easily be changed later.
- Minimum memory: This is to make sure a VM will have enough memory for what you wish even if you enable ballooning.
- Ballooning Device: Check this to enable Ballooning. When enabled, the VM will only be allocated the amount of memory it is actually using. This will give you the possibility to allocate more memory than you actually have, but be aware that this may cause start up problems and crashes.
- Network.
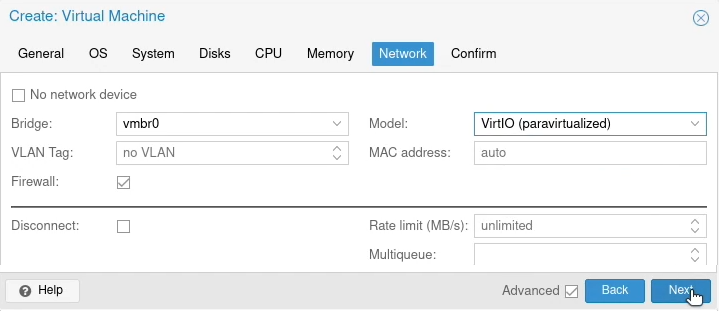
- Bridge: This is the virtual network interface. You can add more after the initial setup.
- VLAN Tag: Here you can enter a VLAN tag for which VLAN you wish your VM to be in. The tag is a number that can be between 1 and 4094.
- Model: There are different types of network interface cards you can simulate. Most will make the VM think there is a cable connected. VirtIO will just come up as virtualized. Some operating systems may require one specific type.
- MAC address: Here you are able to set a specific mac address if you require that.
- Disconnect: Checking this simulates taking out a network cable. It can be helpful when you try different things and need to disconnect without deleting the entire network configuration.
- Confirm.
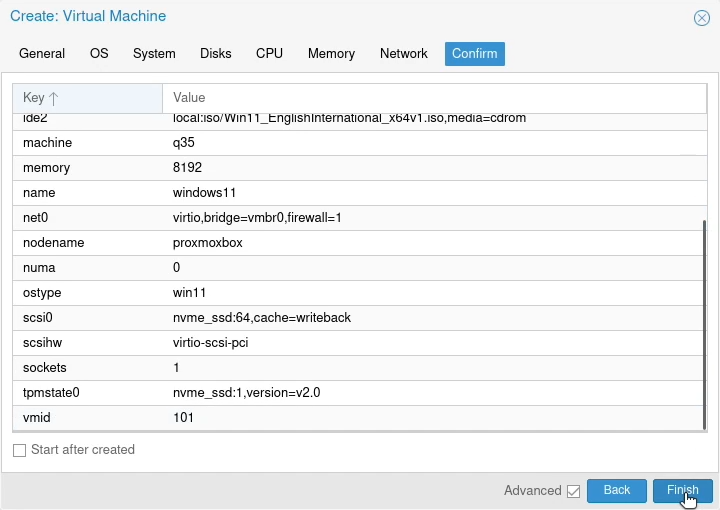
- Start after created: As it says, The VM will start after you hit Finish. Do not do it with Windows virtual machines because there are one additional step.
- Additional ISO
Unlike Linux, Windows need a few additional drivers to get up and running.
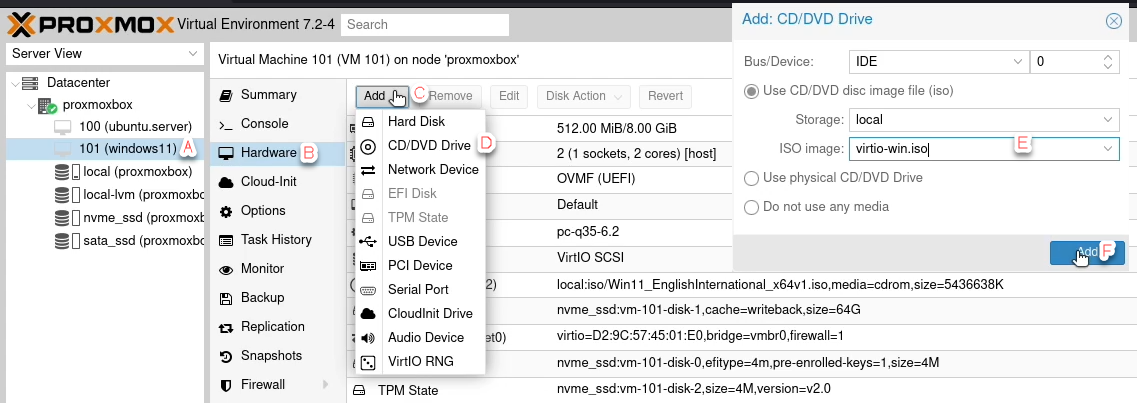
- A: Select your windows VM in the server view.
- B: Click Hardware
- C: Clicking Add will open a drop down menu with additional hardware you can add. This includes both virtual and physical items.
- D: To add the VirtIO ISO, click CD/DVD Drive.
- E: Like when you configure the VM you can choose which storage and ISO image. Select the virtio-win.iso file.
- F: Click Add to add the additional ISO addition.
Install Windows 11
To start the Installation open a console window and start the VM if it has not already been started. Press any key to boot from CD or DVD. If you wait to long and don't press anything here you might have to reboot the VM.
3 ways to open the console: - Double clicking the VM in server view. - Right clicking it followed by clicking console in the menu that comes up - Clicking the console button upper right in the window when you have selected the correct VM.
Windows installation
-
Localization.
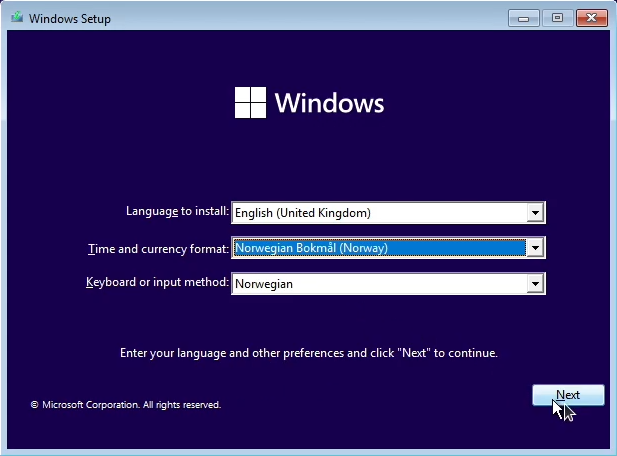
- Language to install: The display language for the system.
- Time and currency format: So the clock and dates looks right for what you are used to.
- Keyboard or input method: The type of language on your keyboard.
-
Install or repair.
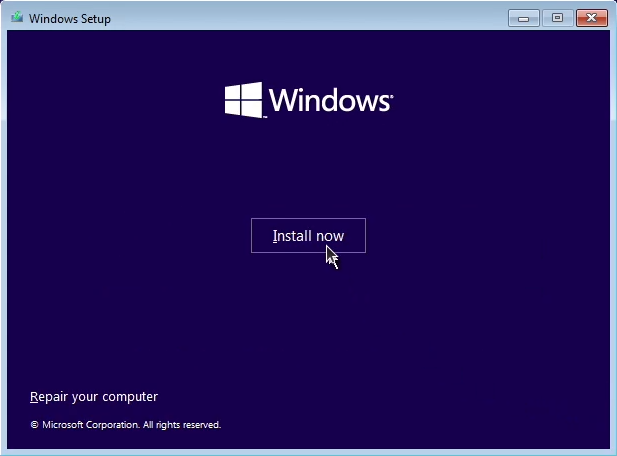
- Install now: This way if you are installing a new instance of Windows.
- Repair your computer: For when you have screwed up your VM and also not taken a backup of it.
-
License key.
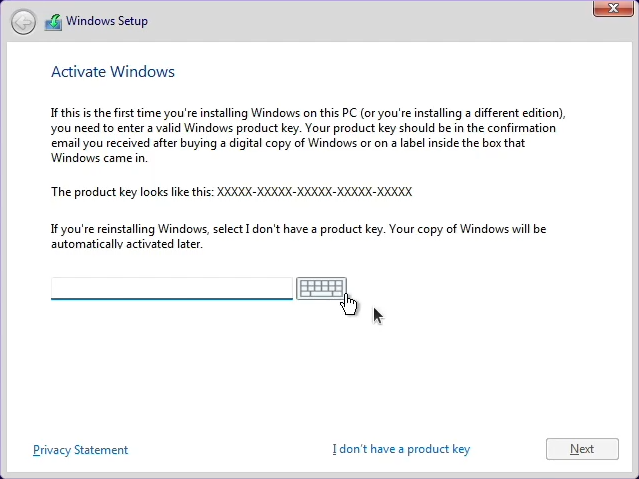
- Next: To be able to click this you will have to enter a product key.
- I don't have a product key: I usually use this since i often don't know how long a VM will last.
-
Windows version.
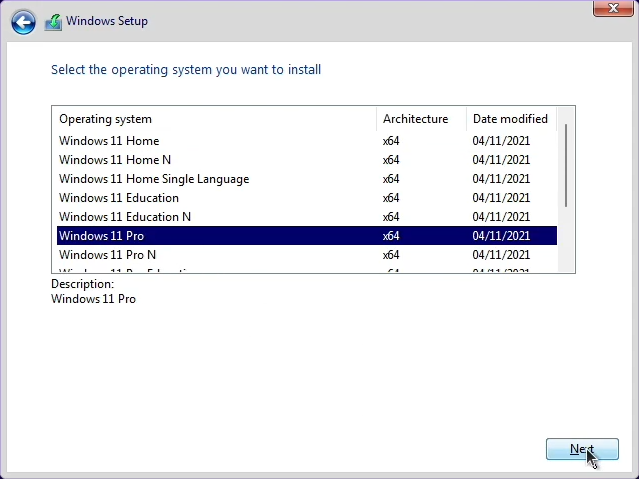
- For this I will be using the pro variant. Not all features are available in the home variant like remote connection which is what i use to connect to the VM.
- This step is skipped if you add a product key in the previous step.
-
License agreement.
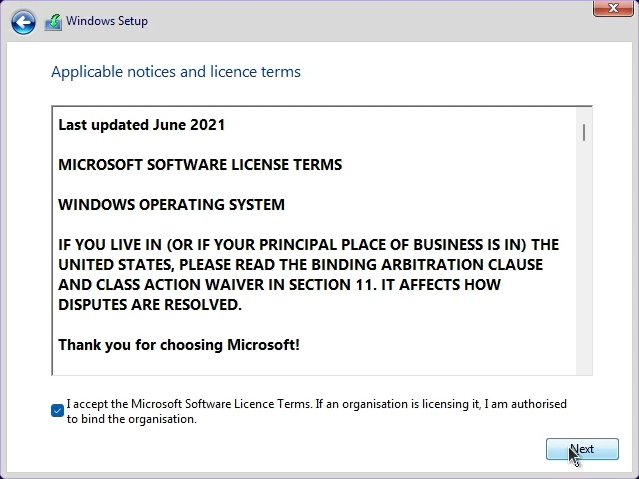
- A wall of text for you to read if you feel like it.
-
Installation type
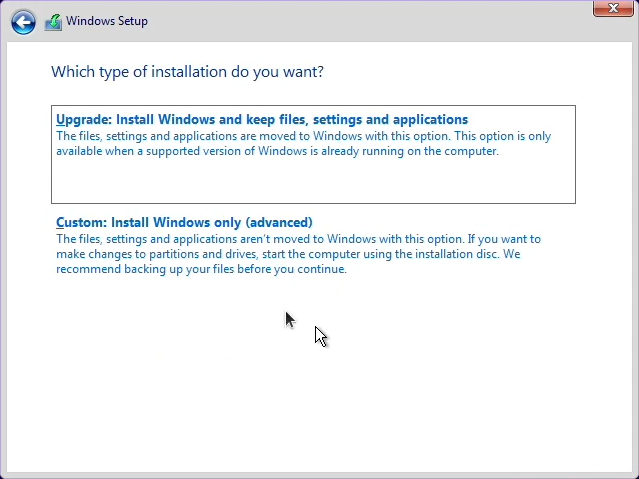
- For this setup, you will have to choose **Custom: Install Windows only (advanced)
-
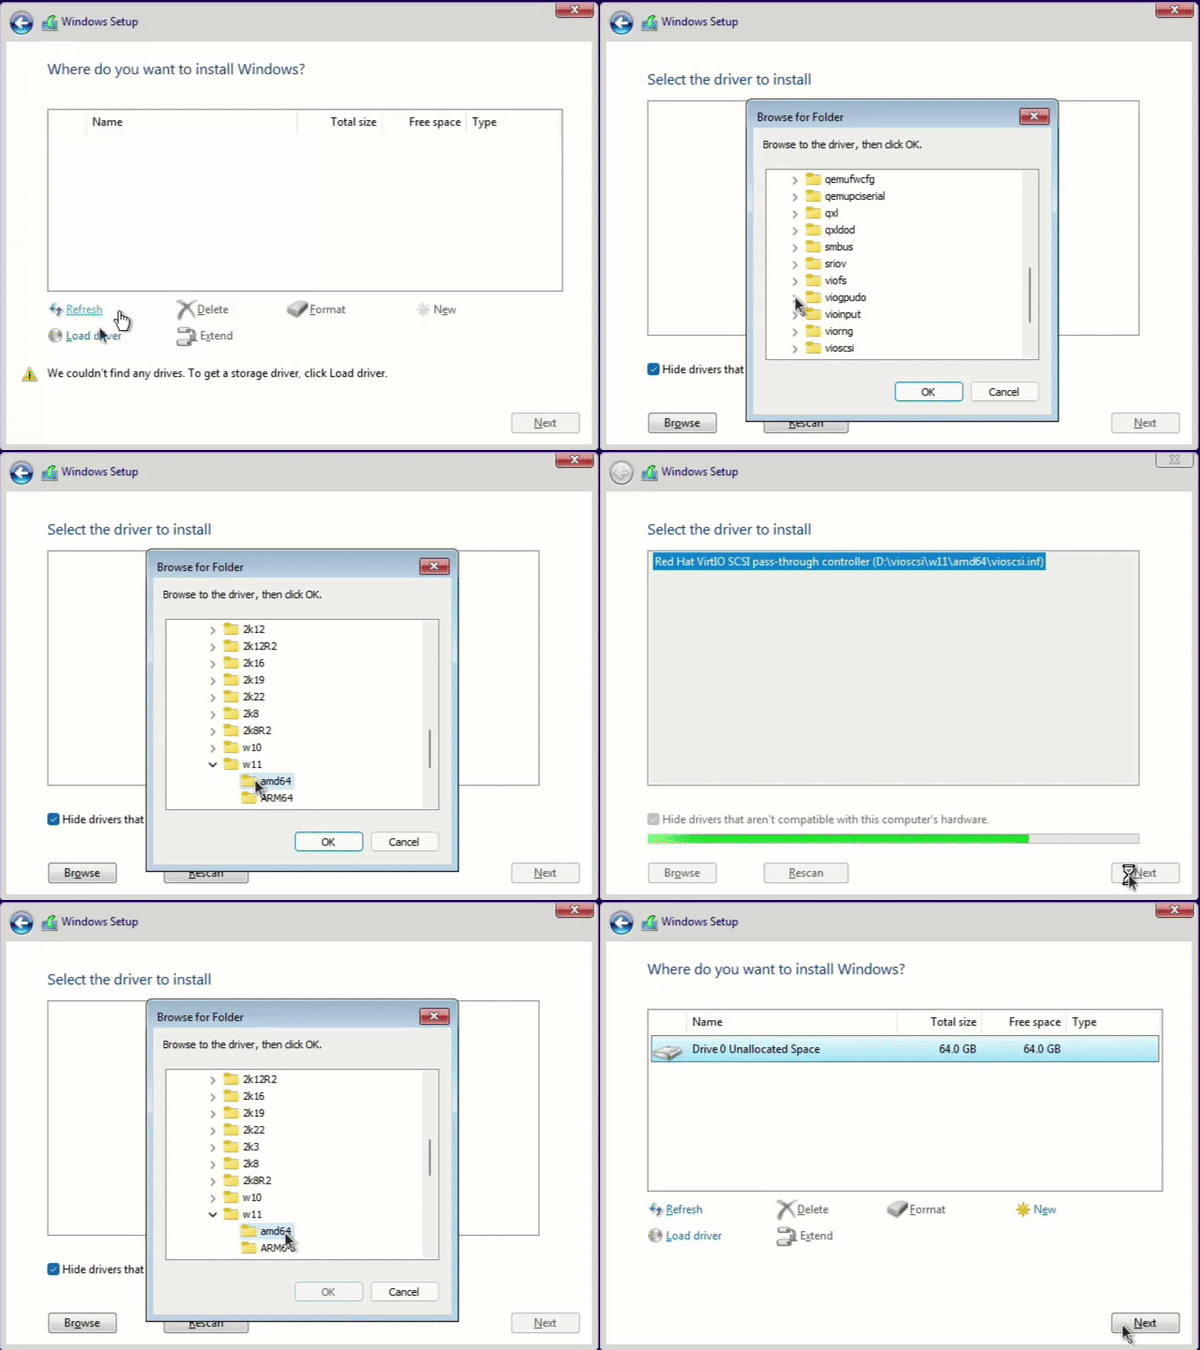
Hard drive
-
The first thing you might notice here is that the hard drive does not show up. This is why we added the second ISO file. The driver that is needed is for the SCSI hard drive. The Second one that is practical to add is for the network, but this is optional.
-
Steps for adding the hard drive driver:
- Start with Load driver.
- Then click Browse.
- Choose CD Drive virtio-win-"version".
- Scroll down and expand vioscsi.
- Expand w11 folder for Windows 11.
- As long as you are using a system with a normal processor, click amd64.
- Click ok then next to install the driver.
- The hard drive should now show up in the setup window. You can at this point click next to continue if you don't want the network driver installed yet.
-
Steps for adding the network driver:
- Start with Load driver.
- Then click Browse.
- Choose CD Drive virtio-win-"version".
- Scroll down and expand NetKVM.
- Expand w11 folder for Windows 11.
- As long as you are using a system with a normal processor, click amd64.
- Click ok then next to install the driver.
- You will not see anything extra when this is installed but Windows will be able to do some updates during installation.
-
Next unless you wish to format the drive in a specific way click Next to continue.
-
-
Waiting time! The amount of time this will take varies on what resources and type of disk you have allocated to the virtual machine. After the Windows have been installed it will reboot.
Windows setup
After the machine have rebooted, you will be prompted to setup Windows. Windows will reboot multiple times during the setup.
- The first you will setup again is your country and keyboard layout. If you installed the driver for the network, the system will start updating then restart.
- Let's name your device: Type in the name you want your VM to have. It will reboot again.
- Personal or work/school use: For a regular setup with no domain or organization control you should just set it up for personal use.
- User account You can either log in with your Microsoft account or you can create an offline account. Offline accounts might only be available for Windows pro. I have not tested the home variant enough to be sure.
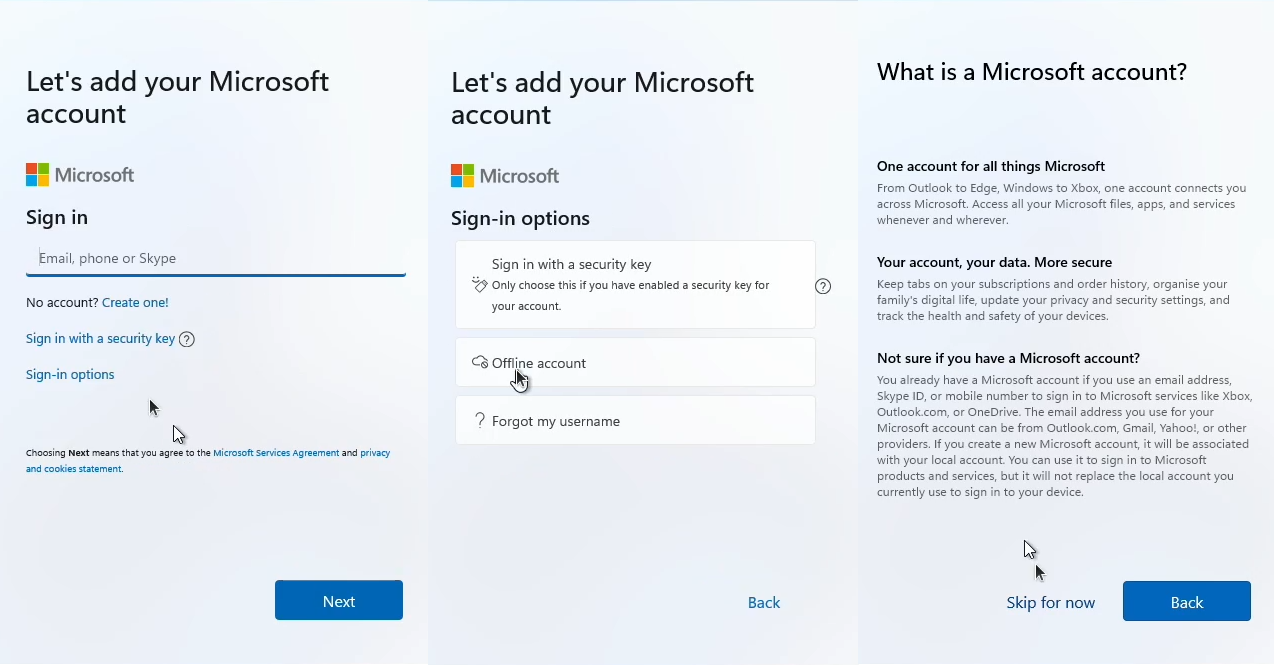
- To create an offline account simply click the options below in each menu.
- A: Sign-in options
- B: Offline account
- C: Skip for now
- User creation. If you log in with an account you do not have to go through these steps.
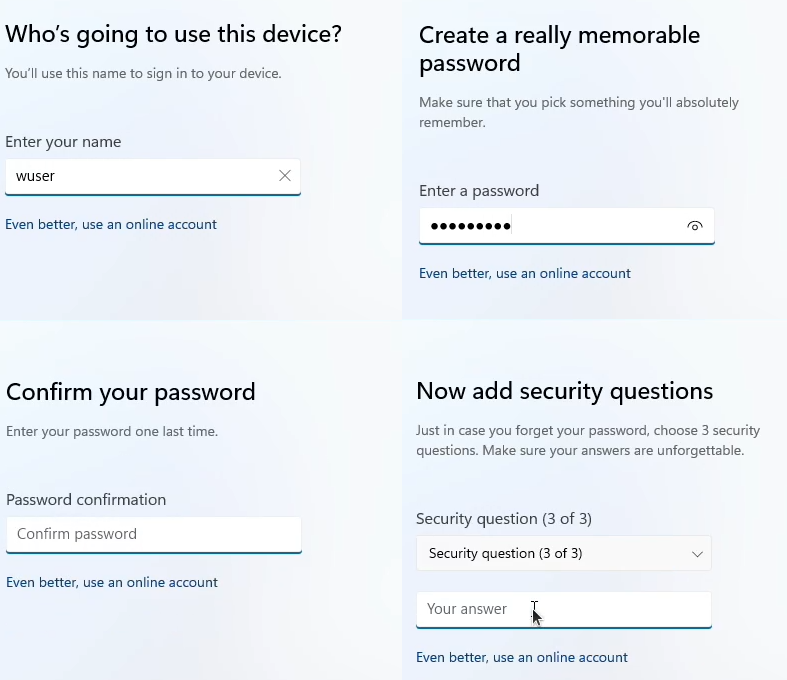
- Who's going to use this device? type in a name or username you wish for the VM
- Password Have to be typed in twice as usual.
- Security questions This is a backup for when the password is to secure, even for you!
- A whole lot of clicking The following options you can agree or disagree with:
- Let Microsoft and apps use your location.
- Find my device.
- Send diagnostic data to Microsoft.
- Improve inking & typing.
- Get tailored experiences with diagnostic data.
- Let apps use advertising ID.
- After this, Windows will look for some more updates and do some more things in the background.
- You should enter the desktop when all settings have been completed. There are just a a bit more to do to have all the drivers up and going.
- Right click the start menu (Windows logo on the lower bar)
- Click Device Manager
- You should see at least one PCI Device marked with and error.
- Right click one of the devices with an error and click update driver.
- In the window that opens, click Browse my computer for drivers.
- On the next side click Browse.
- In the file browser, navigate down to the virtio-win ISO and select it. You do not need to specify any drivers.
- Click Next. Windows will go through the ISO and install the drivers it needs.
Windows 11 is now ready for use!
Remote connection
Even though Proxmox provides a great interface to manage the virtual machines on it, it can be practical to use something like RDP. If you have Windows pro, you can easily enable RDP. There are other programs like TeamViewer that also does this that i will not get into now.
- Start by right clicking the Windows start menu.
- Click Settings.
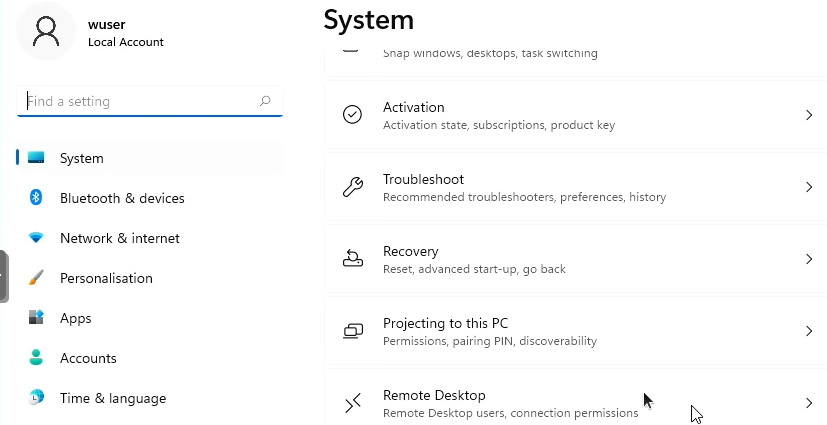
- Make sure you are in the System menu then scroll down to and click Remote Desktop.
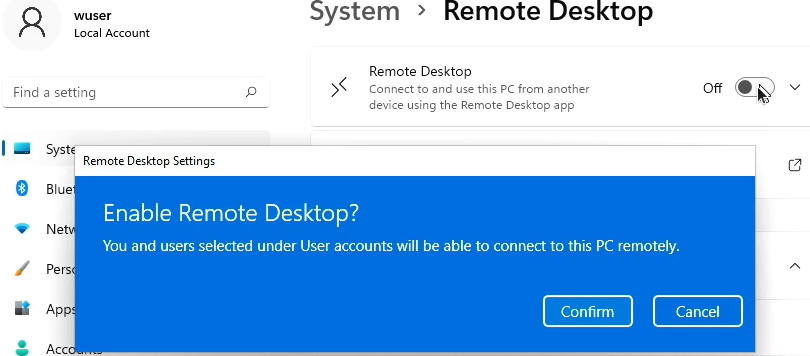
- When enabling RDP you will get a popup message to confirm you really wish to enable it. Click Confirm and you are good to go!
To connect to the machine you will need to know it's IP address.
- Open a terminal program simply by pressing the Windows key and typing "terminal" followed by hitting the enter key.
- In the terminal window type in "ipconfig" and click enter.
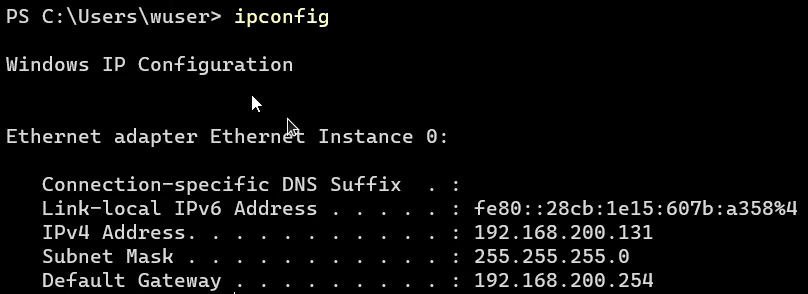
- IPv4: This is the address you will need to connect from other devices.
- Subnet Mask: The subnet mask is used to divide IP addresses.
- Default Gateway: This is the IP of the device which is usually the network router that leads to the internet or other networks.
Connecting from Linux
To connect with the RDP protocol from Linux you might need to install a program for it. Remmina is a good program to use.
To install Remmina, start with opening a terminal window and updating the package manager with the command "sudo apt update" followed by "sudo apt install remmina"
When you have installed Remmina it is quite straight forward connecting.
- Type in the IP address of the device you wish to connect to in the search bar and press the enter key.

- The first time you try to connect, you will get a message about accepting a certificate. This is normal for protocols like RDP and SSH. Click Yes that you accept.
- Enter the username and password in the credential window. Nothing has to be entered in the domain field.
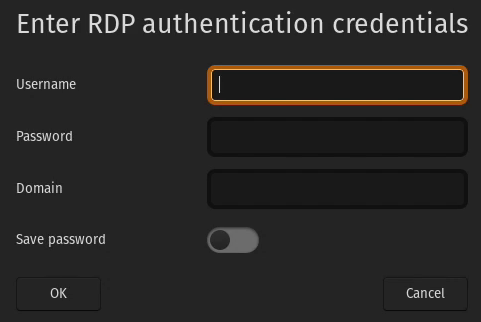
Thats all there is to it if you wish to connect from Linux.
Connecting from Windows
Windows comes with a RDP program so nothing extra needs to be installed.
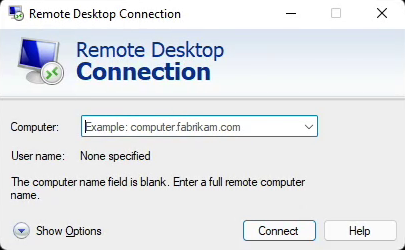
- Press the Windows key or start menu and type in rdp and click Remote Desktop.
- In the first window enter the IP address of the machine you wish to connect to.
- In the second window, enter the username and password.
- Press yes in the window that comes up to accept connecting to the VM. you can also check Don't ask me again for this computer.
Unless something went wrong you should be connected to your VM.
What can you use it for?
- Remote connection from outside your network. You can use a VPN and RDP for this but a more simple way is to use a program like TeamViewer. This gives you a way to play with your homelab from where ever you are (with a network connection). It is possible to just open the port for the RDP protocol in your router but this should not be done! It will give an opening for hackers to abuse.
- Snapshot. You are able to save the machine state with taking a snapshot. This means you can try out programs or other things that might destroy the operating system and when you are done just revert to the snapshot.
- Windows specific programs. I use Linux a lot but sometimes I need to use Windows specific programs. I can easily connect to a VM and just use them without having to also have windows on my laptop.
- Hardware passthrough. If you have the right hardware you are able to pass through the graphics card to a VM. This means you can have a VM ready to start up to remotely play games on from a laptop if you wish.
- Game server. Not all games have server software for Linux and often it is more simple to manage a server on Windows when you are new to it.